Frequently Asked Questions (FAQs)
iata easypay portal
Contents
IATA EASYPAY access and Account creation
1) How can I access the IATA EasyPay Portal?
2) How can I create an IATA EasyPay Account?
3) What information do I need to onboard an IATA EasyPay Account?
4) How can users be added to an IATA EasyPay Account?
5) How can a user request access to an IATA EasyPay Account?
6) Where can I find user access requests?
7) How can a user be removed from the IATA EasyPay Portal?.
IATA EASYPAY WALLET MANAGEMENT
8) How can a bank account be registered?
11) How is an IEP number generated?
12) How can funds be transferred among wallets?
13) How can funds be withdrawn?
14) How can wallet funding movements be reviewed?
15) Where can IATA EasyPay transactions be reviewed?
16) How do I change my funding source?
17) Where can I find help and support for the IATA EasyPay Portal?
IATA EASYPAY access and Account creation
1) How can I access the IATA EasyPay Portal?
Access to the IATA EasyPay Portal will only be available through IATA Customer Portal via URL: http://www.iata.org/customer-portal.
On the IATA Customer Portal, you will be prompted to log-in with your IATA Customer Portal credentials. If you are not registered on the IATA Customer Portal, you will have to register first by clicking on the ‘Please self-register’ option.

2) How can I create an IATA EasyPay Account?
An IATA EasyPay Account can only be opened by someone with Portal Administrator and Authorized Signatory privileges for the head office of the travel agency.
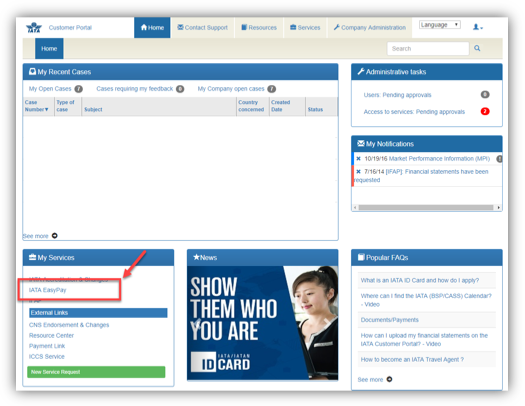
You will select the IATA EasyPay ‘New Service Request’ link in the IATA Customer Portal, which will redirect you to the IATA EasyPay Portal.
![]()

After clicking ’Open IATA EasyPay Account’, you will be prompted with a confirmation disclaimer as shown below:

After confirming, you need to wait while the IATA Customer Portal connects to the IATA EasyPay Portal.

An email is sent to you from IATA Customer Portal Team notifying you that access has been granted to the IATA EasyPay Portal, with an IEP Admin role. Such responsibilities of the IEP Admin role are outlined in the Terms and Conditions available on the IATA EasyPay Portal.
The
Authorized Signatory is granted automatic access to the IATA EasyPay Portal on
initiating the IATA EasyPay Account opening. This means that you can come back
to the IATA Customer Portal at any time to complete the opening of your IATA
EasyPay Account. The IATA EasyPay link, under My Services on the Home
Page, will take you directly to the IATA EasyPay Portal without having to log
in again, via Single Sign-On (SSO).
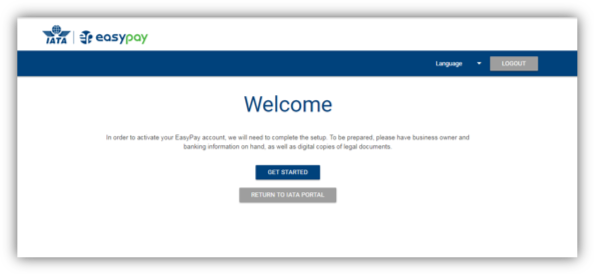
Once accessed, you will be brought to the first page of the IATA EasyPay Portal where you need to click-on the ‘Get Started’ button.
After clicking on the button, the Terms & Conditions (Ts&Cs) page on the IATA EasyPay Portal will be displayed. You must read the entire contents, which may also be printed by clicking on the printer image in the top-right corner. Review and fully understand the Ts&Cs before accepting them by checking the box at the bottom and then clicking-on ‘Accept’.

After accepting the Ts&Cs you will be redirected to an Onboarding series of pages for which specific information will need to be provided.
3) What information do I need to onboard an IATA EasyPay Account?
If you have not setup your account, you will be redirected to a series of Onboarding pages. Required fields must be completed in order to submit the onboarding form.
The information requested below is required to assist in creating the IATA EasyPay account.
Who needs to provide this information?
We will request this information from the Legal Authorized Signatory who opens a new IATA EasyPay account on behalf of a legal entity.
General Information: 
Provide your basic business information
You must provide all of the following:
· Legal Business Name
· Doing Business As or Trade Name (If Applicable)
· Tax Identification Number (Business Number or Social Insurance Number)
· Type of Business or Organization (For example: sole proprietor, partnership, corporation)
· Principle Place of Business (Physical Address)
· Contact Information
Once all information has been entered, select the next button in the bottom right corner of the first onboarding screen.
![]()
What is Beneficial Ownership and why do I have to provide this information?
A beneficial owner is an individual or organization, if any, who holds 10% or more equity ownership of your business. To help fight financial crime, country specific regulations require us to obtain, verify, and record information about the beneficial owners of legal entity customers. Legal entities can be abused to disguise involvement in terrorist financing, money laundering, tax evasion, corruption, fraud, and other financial crimes. Requiring the disclosure of key individuals who own or control a legal entity (i.e., the beneficial owners) helps law enforcement investigate and prosecute these crimes.
Provide Your Business Ownership Information
For Companies with beneficial owners, you must provide the following information for all direct and indirect owners owning 10% or more of the company:
· Business Type (Individual or Organization)
· Individual
o Full Legal Name (First, Middle, and Last)
o Percentage of Ownership
o Role/Title (for example: CEO, President, etc.)
o Unexpired Passport or National Identification Number, Country of Issuance, and Expiration Date
· Organization
o Legal Business Name
o Percentage of Ownership

Details explaining the ownership structure of the business. For example:
· Agency is 100% owned by Entity Holdings Ltd.
· No Individual shareholder of Agency holds more than 6.28% of the equity shares.
· The major shareholder of the Agency is ABC Agency, who holds 65.2% of the equity shares. ABC Agency is a publicly quoted company listed on the London Stock Exchange.
· The remaining shares are held by 28 Directors and senior managers of the company, and the largest individual shareholder is the Chairman, who holds 6.28%.
Managing Party Information:
· Full Legal Name (First, Middle, and Last)
· Role/Title (for example: CEO, President, etc.)
· Date of Birth
· Unexpired Passport or National Identification Number, Country of Issuance, and Expiration Date.
How do I enter or edit the Beneficial Ownership Information?
To enter the beneficial owner information, click the edit icon.
![]()

![]() To remove
an owner, click the trash bin icon to the right of the edit icon.
To remove
an owner, click the trash bin icon to the right of the edit icon.
The Ownership fields will display below the table.

How do I know I have completed providing Beneficial Ownership Information?
Once you have
fulfilled the 10% requirement, the table will display as seen below:

Documents

Provide your business’s formation and Proof of Existence documentation
You must upload the following:
· Corporation
o Trade Register (If Applicable)
o Formation Document
§ Articles of Incorporation/Organization
o One of the following Proof of Existence
§ Certificate of Corporate Status
§ Certificate of Good Standing (if agency founded > 1 year ago)
§ Certificate if Incorporation (if agency founded < 1 year ago)
§ City/State/Province-issued Business License (non-expired)
· Partnership
o Trade Register (If Applicable)
o Formation Document
§ Partnership Agreement (1st and last page/signature page)
o One of the following Proof of Existence
§ City/State/Province-issued Business License (non-expired)
§ Business Registry with the Province or Territory
§ Any Other Similar Record that Confirms its Existence Partnership
· Sole Proprietorship
o Trade Register (If Applicable)
o Formation Document
§ DBA/Fictitious Name/Trade Name Certificate
o One of the Following Proof of Existence
§ Business License Document
Funding Source

Provide the Business’s Funding Source Information
You must provide the following:
· Financial Institution Name
· Branch Name
· Financial Institution Address
· 3 Digit Financial Institution Number
· 4 Digit Branch Transit Number
· Account Number
· Copy of a Recent Bank Statement or Voided Check (excludes counter checks)
· Acceptance Statement
Note: Some banks include the Designation number on the Check. This is not Required to create the Funding Source.

How do I save my Onboarding form?
To save the onboarding form, click the Next button or the numbered page icon buttons at the top of the screen. Once clicked, a save notification will display.

How do I submit my Onboarding form?
In order to submit the completed Onboarding form to create an EasyPay Account, provide the personal information of the Legal Authorized Signatory and click Submit.
Submit
Provide your personal information
If you are a business Legal Authorized Signatory, you must provide all of the following:
· Full Legal Name (First, Middle, and Last)
· Role/Title (for example: CEO, President, etc.)
· Date of Birth
· Residential Address
· Unexpired Passport of National Identification Number, Country of Issuance, and Expiration Date

Select Submit when finished.
Please be advised that, after a successful submission, and all required requested information and documentation are provided, the internal review will take between 1-3 business days.
4) How can users be added to an IATA EasyPay Account?
Once the IATA EasyPay Account has been created, the IEP Admin will first create the Manager of the Master Wallet role in order for the Wallet Manager to then add additional user roles to the EP Account. The IEP Admin or the Manager of the Master Wallet can then add other users from the ‘Services’ tab on the IATA Customer Portal.

This is a two-step process:
a. Subsequent to the initial Account creation, the IEP Admin creates access requests for one or more users on the IATA Customer Portal and assigns the user(s) role(s) (e.g. IEP Admin, Manager of the Master Wallet, Ticket Issuer, Read Only) and clicks ‘Continue’:

After clicking continue, the window below will be displayed confirming the request:

b. This will create the user(s) on the IATA EasyPay Portal with a ‘Pending status’.
c. The IEP Admin or Manager of the Master Wallet will then need to approve the user role requested on the IATA EasyPay Portal from the ‘Users’ tab. The IEP Admin or Manager of the Master Wallet can also change the IATA EasyPay role of the user(s) request at this stage.

d. As soon as the IEP Admin or Manager of the Master Wallet has approved or declined the request, an email notification will be sent to the user from the IATA Customer Portal Team informing them that access has been granted or denied with their corresponding IATA EasyPay Portal role. This action will also automatically update the user’s access to the IATA Customer Portal.
e. The newly approved user(s) will receive a notification email that access to IATA EasyPay Portal has been granted. The user(s) will be able to access the IATA EasyPay Portal in one of two ways:
(1) By clicking on the ‘IATA EasyPay’ link on the IATA Customer Portal, as displayed below:

(2) By first clicking on the tab ‘Services’

Then by clicking on the link as displayed below:

5) How can a user request access to an IATA EasyPay Account?
Other users from the Agency can request access to the IATA EasyPay Portal from the ‘Services’ page on the IATA Customer Portal (IATA EasyPay link).

This action will open a window where the user(s) selects the proposed role they would like to have (e.g. Ticket Issuer)

Once the user confirms the request, the IEP Admin and/or Manager of the Master Wallet(s) will receive an email notification of a user access request on the IATA EasyPay Portal.
The user that has made the request will see IATA EasyPay with status ‘Pending Approval’ under ‘My Services’ tab on the IATA Customer Portal until approved:

The requester can review the status of the request on the IATA Customer Portal, under ‘Services’.
![]()

The IEP Admin or Manager of the Master Wallet will then need to approve the access requested on the IATA EasyPay Portal from the ‘Users’ tab. The IEP Admin or Manager of the Master Wallet can also change the IATA EasyPay role of the user at this stage.

As soon as the IEP Admin or Manager of the Master Wallet has approved or declined the request, an email notification will be sent to the user informing them that access has been granted (with their corresponding IATA EasyPay Portal role) or denied. This action will also automatically update the user’s access to the IATA Customer Portal.
![]()

If approved, the user will be able to access the IATA EasyPay Portal in one of two ways:
(1) By clicking on the ‘IATA EasyPay’ link on the IATA Customer Portal, as displayed below:

(2) By clicking on the tab ‘Services’

Then the user will access the IATA EasyPay Portal by clicking the link displayed below:
![]()
6) Where can I find user access requests?
Only IEP Admin or the Manager of the Master Wallet are allowed to accept or decline user access requests by doing the following:
Go to ‘Users’ > ‘Users’ tab. All pending requests will be displayed:
The IEP Admin and Manager of the Master Wallet will be able to review all the active users under the same tab as where the assigned role and available user access can be reviewed by selecting from the drop-down list:
 The IEP Admin or Manager of the Master Wallet will then have to
either ‘Approve’ or ‘Deny’ the user access request.
The IEP Admin or Manager of the Master Wallet will then have to
either ‘Approve’ or ‘Deny’ the user access request.
7) How can a user be removed from the IATA EasyPay Portal?
Only the IATA Portal Admin is allowed to perform this action. To do so, please do the following:
Go to the IATA Customer Portal and click-on Company Administration > Access to services
For the selected user, click-on ‘Edit’

Click then ‘Deny Access’

Denying IATA EasyPay Portal access sets the status to Access denied so that the next time the selected user logs into the IATA Customer Portal the IATA EasyPay link will not be available.
IATA EASYPAY WALLET MANAGEMENT
8) How can a bank account be registered?
Only the IEP Admin is allowed to perform this action during the onboarding process of the Agency when opening the IATA EasyPay Account.
Please see below the information that was requested at that time:

Note, only one bank account can be added and funds will be transferred from (and withdrawn to) this bank account.
9) How can a Wallet be added?
In order to add a wallet to the IATA EasyPay Account, either the IEP Admin, Manager of the Master Wallet or Sub-wallet Manager must perform the following:
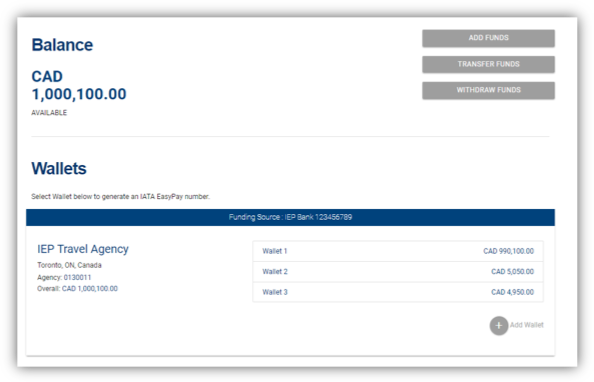
Under the ‘Wallets’ tab, click-on the “plus” icon button located under the Agency details in the bottom right corner of the wallet:
![]()

A new Wallet will become available as displayed in the example below:
![]()
10) How can funds be added?
Only IEP Admin, Manager of the Master Wallet and Sub-wallet Manager users are allowed to add funds to an IATA EasyPay wallet. These roles need to set up a bank transfer from the source bank account to the IATA EasyPay bank account. The source bank account is the one registered when opening the IATA EasyPay Account.
To obtain the required reference details for the bank transfer, please follow the steps below:
Go to ‘Wallets’ tab and then click-on ‘Add Funds’
![]()

Under ‘Bank Transfer’ tab, please click-on ‘Add Funds’ as displayed below, where a pop-up window will appear and you will be provided with the details of a bank account as given below:

Please copy all the details displayed as they might be required from the bank of the Agency.
Click-on ‘Cancel’ button to close the window:
![]()
The funds will be reflected in the IATA EasyPay Wallet within 3-5 Business Days, and subsequently, funds can be transferred to existing sub-wallets.
11) How is an IEP number generated?
The IATA EasyPay Number (IEP number) is a virtual card number that can be used to pay for transactions within the GDS.
The IEP number is linked to the wallet, so the transaction must be made in the currency of the wallet, and there must be an available balance to cover the value of the transaction – this is evaluated at the time the IEP number is used, not at the time it is generated.
Go to the ‘Wallets’ page by clicking on the button as displayed below:
![]()

Click-on the Wallet from which you want to generate an IEP Number
![]()
A pop-up window will appear and, if there are available funds, the IEP number ‘Generate’ button will be activated. Click-on it:
![]()

An IEP Number will be generated and displayed. This number can be copied to the clipboard as shown below:
![]()

Bear in mind, if a previously non-used or still valid IEP number was created in the past, the same number will be displayed with only the option to click-on the ‘Copy’ button, where it can then be pasted into the GDS work screen.
Transactions processed against previously generated IEP numbers will be displayed at the bottom of the page.

12) How can funds be transferred among wallets?
Funds can be transferred among all existing wallets. Only IEP Admin, Manager of the Master Wallet and Sub-wallet Manager roles are allowed to perform this action. To do so, please do the following:
Click-on ‘Wallets’ tab and then click-on ‘Transfer Funds’
![]()
![]()
Select ‘From’ field and choose the Wallet from which funds are to be transferred from the drop-down list, then select the ‘To’ field and choose the Wallet to which funds are to be transferred from the drop-down list finally click-on the ‘Transfer’ button. An example is shown below:
![]()
![]()
![]()
![]()

A success pop-up page will be shown and the transfer will be made immediately:

13) How can funds be withdrawn?
Funds can be withdrawn from a wallet back to the original source bank account. Only IEP Admin, Manager of the Master Wallet and Sub-wallet Manager roles are allowed to perform this action. To withdraw funds, please do the following:
Click-on ‘Wallet’ tab and then click-on ‘Withdraw Funds’
![]()
A pop-up window will appear, from the drop-down list select the wallet from which funds are to be withdrawn, then please input the amount to be withdrawn, finally click-on the ‘Withdraw’ button:
![]()
![]()
![]()

The withdrawn Net Total amount will be transferred to the original funding source bank account associated with the Master Wallet. The funds will be available in the registered bank account within 3-5 business days.
The first three withdraws will have no fee in a calendar year. On the fourth withdraw and all subsequent withdraws, the Fee field will populate and will be deducted from the Amount provide; resulting in the Net Total that will be the amount of the withdraw.
14) How can wallet funding movements be reviewed?
Only IEP Admin, Manager of the Master Wallet and Sub-wallet Manager roles are allowed to perform this action. To do so, please do the following:
Go to ‘Reports’ tab:
![]()

Under the tab ‘Reports’ a detailed list of funding movements that have already taken place will be displayed:

Date
The date of the transaction
Currency
Currency of the country
Amount
The value of the transaction
IATA Code
Travel Agency IATA assigned code
Funding Source
Agency Bank Name
Type
Either a Transfer or a Withdrawal
Status
Shows whether the transaction was confirmed, declined or pending.
Wallet
Where the funds came from or went to.
User
The user who made the transaction.
Filters can be applied by clicking on the
filter button:
Be aware filtering by too many criteria may return no results.
15) Where can IATA EasyPay transactions be reviewed?
IATA EasyPay transactions can be reviewed by taking the following steps:
Go to ‘Transactions’ tab:
![]()

The fields displayed above are:
Date: The date the transaction was made.
Country: where the operation was made
Currency: currency o the local BSP
PNR: Passenger Name Record
IEP Number: The IEP number used
IATA Code: Travel Agency IATA assigned code
Amount: The amount of the transaction
Type: Ticket, Refund, EMD
Status: The status of the transaction. Any transaction that was declined will be shown in red (and will not have changed the available balance). An IATA EasyPay transaction can display the following information under the ‘Status’ column:
· Authorised: IATA EasyPay supplier has processed the authorisation request from GDS/MasterCard. The balance has been adjusted.
· Completed/Completed with exception: IATA EasyPay supplier has confirmed the purchased towards the authorised request.
· Declined: IATA EasyPay supplier processed the transaction but declined it (i.e. the balance was not enough to cover the transaction value). The balance was not changed.
Wallet Name: Travel Agency Wallet name
User: The user who generated the IEP number.
Filters can be applied by clicking on the filter button:

Be aware filtering by too many criteria may return no results
16) How do I change my funding source?
The IEP Admin has access to IATA EasyPay Account Funding Source information. To do so, please take the following steps:
Go to Settings wheel in the upper-right corner and click the icon to view the IEP Funding Source information as displayed below:
![]()


In order to change the funding source, the IEP Admin should raise a case to IATA Customer Service by clicking the “Contact Support” link via the IATA EasyPay Portal.
IATA EASYPAY Help and Support
17) Where can I find help and support for the IATA EasyPay Portal?
All users can access help and support for IATA EasyPay. To do so, please scroll down to the bottom of any page, where the ‘Participating Airlines’, ‘Frequently Asked Questions’ and ‘Contact Support’ buttons appear:
![]()

![]()
A current listing of participating airlines will display in alphabetical order.

For accessing the FAQs click-on ‘Frequently Asked Question’:
![]()
If further help is needed, please click-on ‘Contact Support’:
![]()
You will be redirected to the IATA Customer Portal for requesting support as shown below:

IATA Customer Service that will send an automatic notification to the Agency once the query is submitted.
The Agency can view the case details in the IATA Customer Portal.
IATA Customer Service will analyse the query received and take necessary actions to provide the Agency with the corresponding solution within one business day where the final solution to the query will be raised.